How to Create a Reimbursement
This section will demonstrate how to submit a reimbursement request for your grant project.
Funded and open grant applications can be found under the tab “Active”. Click “View” by the application to access the application/grant record to perform project activities and submissions.

To access activities, click on "Activities" in the toolbar.

Within this view, you can see all current and past activities associated with the grant record.
In each type of activity, click the "+" to create a new activity for the activity type. (For example, in the image below, clicking the "+" would create a new activity for "Request for Grant Reimbursement."

You would also be able to see any previously opened and/or completed Sub-Contracts activities.) When the new window pops up, you can select "Request for Grant Reimbursement" from the drop down menu.

The Reimbursement Request Activity will open. Click “Save Draft” to be able to edit the activity. Now you will see the following:
- Expenditures and Individual Accountability Report (Enter Expenditures Button)
- Reimbursement Form – will automatically populate with your contract budget and adjust accordingly after expenditures are entered.
- Tabs to upload Supporting Documentation and submit your electronic Signature.

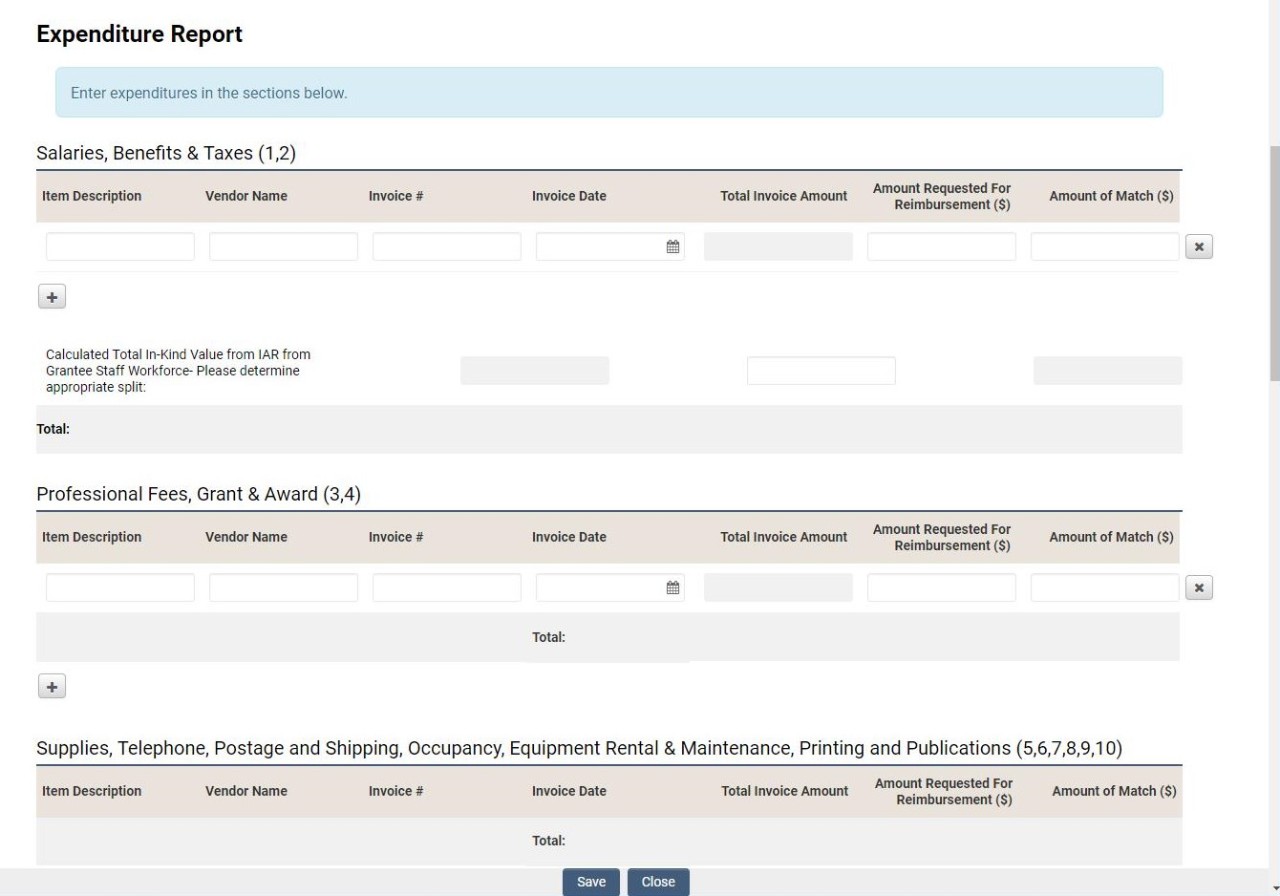
Click the “Enter Expenditures” button to enter your current expenditures for this Reimbursement Request.
Note: You will not be able to submit for expenditures that are not budgeted in the contract budget.
At the top of the worksheet, if applicable, click the “+” under each line item for In-Kind or Grantee Staff Workforce and enter in the required information. The totals at the bottom will auto-calculate.

Scroll down to access the Expenditure Report portion, if applicable, click the “+” under each line item and enter in the required expenditure information. The totals at the bottom will auto-calculate.

Click "Save" and "Close" when you are finished.
Note: Click "Save Draft" again after you return to the activity and the Reimbursement form will automatically adjust with the new expenditures.
Next, enter the Remit Address for payment. Note, if this address has changed since the last reimbursement request or grant, you must submit the new address to Supplier Maintenance.

Next, click on the “Supporting Documentation” tab to upload the following:
- Invoices for expenses (required for all expenses)
- Documentation for Grantee Staff Workforce (only necessary if In-Kind item is identified in the approved contract)
- Proof of Payment to Vendor for each line item (you need only to upload one form of payment that applies)
- If applicable, Proof of Payment for In-Kind Labor (you need only upload which type of proof is applicable)

Next, click on the "Certification" tab and complete the following:
- Check the certification statement and enter name, title and enter the signature date.
- Click on the "Form Summary" button to generate a summary of the reimbursement request.

Click “Save Draft”. Confirm all tabs and information and once complete, click “Submit”.
If you receive an error message in red, one of the following errors may have occurred:
- Mandatory fields are not completed. Check each tab and check all fields marked with a red “*”.
- Amounts requested are not budgeted items. Check the Expenditure worksheet and Contract Budget to make sure all requested funds are within budgeted amounts.

Once the form is successfully submitted, you will receive an automatic email confirmation that the Reimbursement Request was submitted and the grant program notified. You will receive notification from the grant program if revisions are needed or when the request has been completed.
Click Home to return to the dashboard.